
Introduction
If you’re looking to automate workflows without relying on cloud services, n8n is the perfect open-source automation tool. It allows you to connect APIs, databases, and apps just like Zapier — but with full control over your data. In this 2025 guide, we’ll walk you through how to install and self-host n8n step by step on your own server or VPS, using Docker for reliability and scalability.
What is n8n?
n8n (pronounced “n-eight-n”) is a workflow automation tool that helps you connect services like Slack, Gmail, Notion, GitHub, and more. It offers:
- A visual editor for workflows
- Over 400 integrations
- Self-hosting capability
- Data privacy and flexibility
Step-by-Step Guide: Install and Self-Host n8n in 2025
1. System Requirements
Before you begin, make sure your system meets the following requirements:
- OS: Ubuntu 22.04 or later (Linux recommended)
- RAM: Minimum 2 GB (4 GB recommended)
- Docker & Docker Compose: Installed and configured
- Node.js (Optional): Version 18+ if running without Docker
2. Install Docker and Docker Compose
If you don’t have Docker installed, run: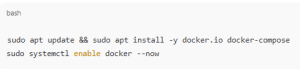
sudo apt update && sudo apt install -y docker.io docker-compose
sudo systemctl enable docker --now
Verify the installation:
docker --version
docker-compose --version
3. Create n8n Directory
Create a folder for your setup: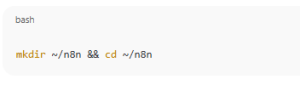
mkdir ~/n8n && cd ~/n8n
4. Create a Docker Compose File
Create and edit the docker-compose.yml:
nano docker-compose.yml
Paste the following content: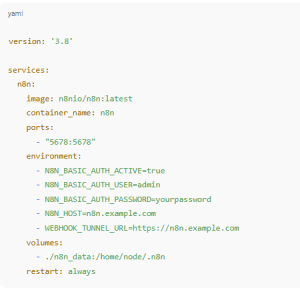
version: '3.8'

services:
  n8n:
    image: n8nio/n8n:latest
    container_name: n8n
    ports:
      - "5678:5678"
    environment:
      - N8N_BASIC_AUTH_ACTIVE=true
      - N8N_BASIC_AUTH_USER=admin
      - N8N_BASIC_AUTH_PASSWORD=yourpassword
      - N8N_HOST=n8n.example.com
      - WEBHOOK_TUNNEL_URL=https://n8n.example.com
    volumes:
      - ./n8n_data:/home/node/.n8n
    restart: always
Tip: Replace
n8n.example.comwith your own domain or server IP.
5. Run n8n
Start the container:
docker-compose up -d
Check the logs:
docker logs -f n8n
Now visit http://your-server-ip:5678 in your browser.
You’ll be prompted to log in with your admin username and password.
6. Set Up Reverse Proxy (Optional but Recommended)
For SSL and domain access, use NGINX or Caddy.
Example for Caddy (easiest setup):
:443 {
  reverse_proxy localhost:5678
}
Caddy will automatically handle Let’s Encrypt SSL certificates.
7. Enable Persistent Data and Backups
All n8n data is stored in ./n8n_data.
To back it up:
tar -czvf n8n_backup_$(date +%F).tar.gz ./n8n_data
You can also use external volumes or cloud storage for redundancy.
8. Optional: Connect a Database
For larger deployments, connect n8n to PostgreSQL or MySQL.
Add to your Docker Compose file:
DB_TYPE=postgresdb
DB_POSTGRESDB_HOST=postgres
DB_POSTGRESDB_DATABASE=n8n
DB_POSTGRESDB_USER=n8n
DB_POSTGRESDB_PASSWORD=securepassword
Final Checks
✅ Access your n8n dashboard at: https://n8n.example.com
✅ Secure with HTTPS
✅ Set up cron jobs or webhooks
✅ Enjoy full automation under your control
Install n8n: Full Self-Hosting and Setup Guide for 2025 (F.A.Q)
Can I run n8n without Docker?
Yes, n8n can be installed using Node.js and npm, but Docker is preferred for simplicity and stability.
How do I update n8n?
Run:
Is n8n free for commercial use?
Yes, n8n is open-source under the Sustainable Use License, allowing self-hosted commercial use.
0 Comments