")
Remote Desktop Protocol (RDP) is widely used to access Windows servers and PCs remotely. One of the most important user-experience settings is screen resolution. If the resolution is not set correctly, you may face blurry visuals, oversized windows, or black borders. This guide explains how to set or change screen resolution in RDP on both Windows and macOS.
1. Change Screen Resolution Before Connecting
Windows (mstsc.exe)
- Press Win + R, type mstsc, and press Enter.
- Click Show Options.
- Go to the Display tab.
- Use the slider under Display configuration to choose the resolution size.
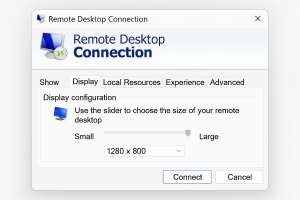
- Click Connect.
This setting controls the resolution before the RDP session starts.
2. Use Fullscreen or Custom Resolution
Fullscreen Mode
To connect in fullscreen mode (recommended):
- In the Display tab, check “Use all my monitors for the remote session” (optional).
- Move the resolution slider to Full Screen.
Custom Resolution Launch (Advanced)
You can launch RDP with a custom width/height using a command: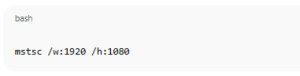
mstsc /w:1920 /h:1080
Replace 1920×1080 with your desired resolution.
3. Edit the .rdp File for Permanent Settings
You can create or modify an .rdp configuration file:
- Open Notepad.
- Add lines like:
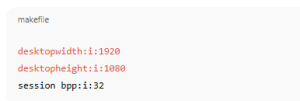
desktopwidth:i:1920
desktopheight:i:1080
session bpp:i:32
- Save as server.rdp.
- Double-click to connect with those exact settings.
This is the best way for fixed custom resolutions.
4. Change Resolution Inside the RDP Session
Some Windows servers support resolution changes inside the remote session.
Steps
- Right-click the desktop.
- Select Display settings.
- Change Display resolution.
- It will automatically resize your RDP window.
(Note: If dynamic resizing is disabled, this option may not appear.)
5. Enable Dynamic Resolution (If Your RDP Resizes Weirdly)
Dynamic resolution allows the screen to auto-adjust when you resize your RDP window.
Check that the following is enabled:
- Open gpedit.msc.
- Navigate to:
Computer Configuration → Administrative Templates → Windows Components → Remote Desktop Services → Remote Desktop Session Host → Remote Session Environment - Ensure “Use advanced RemoteFX graphics for Remote Desktop sessions” is Enabled.
- Restart RDP.
6. macOS RDP Client Resolution Settings
- Open Microsoft Remote Desktop (Mac).
- Select your saved PC → click Edit.
- Under Display, choose:
- Default for this display, or
- Resolution → select a custom size.
You can also enable Fit session to window for dynamic resizing.
Final Tips
- RDP usually works best in Fullscreen.
- If graphics look blurry, enable High DPI settings on the client.
- For multi-monitor setups, ensure Use all monitors is checked.
How to Set Screen Resolution in RDP (Remote Desktop Protocol) (F.A.Q)
Why is my RDP resolution stuck?
Dynamic resolution might be disabled, or your .rdp file may override settings.
Can I use multiple monitors in RDP?
Yes—enable Use all my monitors for the remote session in Display settings.
Why is my RDP window blurry?
Enable High DPI support or adjust scaling from Windows Display settings.
0 Comments